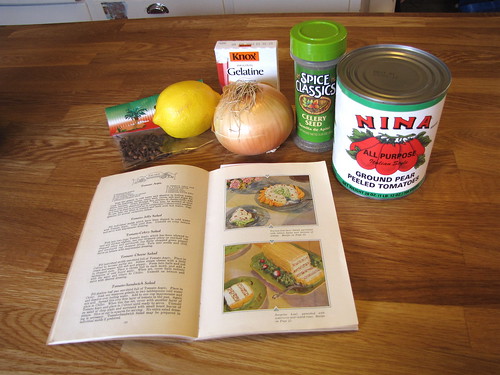
The supplies are here. The lettuce is in the fridge, and I didn’t bother photographing the salt and sugar, etc., but the items pictured here are the rest of those needed to cook the 1930 Tomato Jelly Salad recipe. Stay tuned to see how it goes.
In the meantime, here’s an old recipe for Tomato Jelly — not the same one I’m going to use, but sort of similar. I kind of like that this one has Tabasco in it. Makes it a little more like spicy V-8.
And a bonus illustration of another aspic recipe that I believe I will avoid:
Both of these are from Practical Cooking and Serving: a Complete Manual of How to Select, Prepare, and Serve Food by Janet McKenzie Hill, 1902. (These are Google Books clips, so you may not be able to see them if you’re outside the US. I apologize.)
Aspic. When was the last time you ate it? Have you ever? Maybe not. It’s not really popular these days.
How about gelatin in general? When was the last time you had gelatin (as a major part of a meal, not just a minor ingredient) that wasn’t some brightly-colored fruity-sweet hue? (Heck, I can’t even remember the last time I ate Jell-O.)
As a child, I had Jell-O a lot. (And I use the brand-name here because brand-name Jell-O was what we ate. Orange. Cherry. Lime. Whatever.) It was always dessert of some sort. Plain, much of the time, or other times with whipped cream on top or as part of some fruit salad mixture at a family or church get-together. (Few things said “1970s church picnic” like a Jell-O fruit salad.)
What I didn’t know at the time was that these gelatin salads were sort of a last vestige of a gelatin salad craze from a few decades earlier.
The 1920s, if the cookbooks can be believed, were gelatin-crazed. Salads, particularly, were not complete without the clear, jiggly stuff. The Silent Hostess Treasure Book from 1930 says, “With a supply of salad greens, a jar of dressing, and some tomato or lemon aspic in your refrigerator you will be able to prepare a great variety of delicious salads on short notice.” To the 21st century cook, only the greens and dressing would be necessary. But the 1920s homemaker would need aspic to be acceptably chic. Read More
(From 1926, it says, but it shows an early Monitor Top fridge interior, so perhaps it’s a year or so later.)
Once you’ve bought your electric fridge, you’ll be able to make recipes like this one, from the 1930 GE cookbook The “Silent Hostess” Treasure Book:
Chocolate Ice Cream
1 1/2 oz. unsweetened chocolate (1 1/2 squares)
2 cups rich milk*
1 tablespoon cornstarch
2/3 cup sugar
1 1/2 teaspoons vanilla
1 cup cream
Few grains salt
Melt chocolate and add scalded milk very slowly. Mix cornstarch with sugar and add to chocolate mixture. Cook ten minutes, stirring until thickened. Cool, add vanilla, turn into tray of Super-freezer, and freeze to mush. Fold in whipped cream and return to Super-freezer until proper consistency to serve.
(*”Rich milk” is essentially what we now call “half and half”.)
I posted about the Orange Omelet recipe yesterday. It’s sweet, uses ingredients that are either on-hand or easily available, and looks relatively easy, so there was no reason not to try it immediately. (I discovered the recipe one day, bought the oranges the next, and made the recipe the day after that. I was on a mission.)
Orange Omelet.
Rind of 1/3 orange,
1 egg,
1 tablespoon orange juice,
2 tablespoons powdered sugar.
Beat the yolk of the egg and add the orange rind and juice. Add the sugar. Fold in the beaten white and turn on heated buttered pan and cook until set. Serve with powdered sugar.
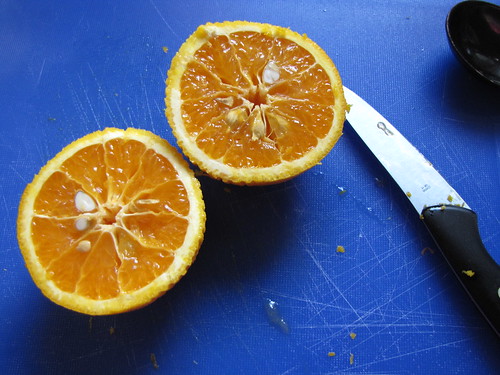
I had eggs and powdered sugar on hand. For the orange, I picked up organic Valencia oranges at Metropolitan Market. (Organic so the orange rind would not have pesticide residue.) Valencias are very sweet, but that doesn’t bother me. I like sweet. This might end up being a dessert omelet… but desserts are lovely things.
Just look at those oranges. Is your mouth watering yet?
I separated the egg yolk and white. Did I mention I’ve never really cooked an omelet before? It was a bit of a gamble. I beat the yolk (“thoroughly,” as one of the older recipes mentioned) and added the orange zest, juice, and sugar. Then I beat the egg white with a milk frother, which was not 100% successful (hint: $1.99 IKEA milk frothers are great with milk, but not so much with anything that has more bulk to it, like egg white), but did eventually get the egg white to a soft peak stage, which seemed acceptable.
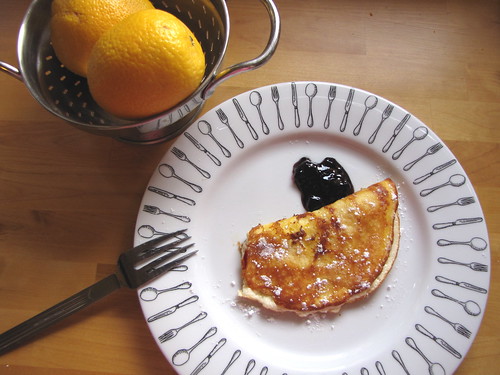
I folded the egg white into the yolk mixture, and off it went into the buttered pan. When it set, I put the pan in the oven for two minutes to finish it, then sprinkled it with a tiny bit of sugar, and (from one of the other recipes in yesterday’s post) served it with a spoonful of marionberry jam.
Verdict:
Wow, that is tasty! It is fluffy and airy and orangey and sweet. Just a touch of jam with it is good, but it’s also very good without the jam. It is indeed dessert-level sweet — very much like a sweet crepe. I imagine that a little less sugar or a less-sweet orange would be just fine if you don’t want that sweetness, but I think it’s great as is.
I can’t really imagine why this recipe has been neglected over the last few decades. It’s lovely. I will eat this again.
Photo by Vincent van Dam.Those who know me know well that I love citrus flavors. Particularly citrus desserts. Lemon cake with raspberry filling. Lemon curd. The elusive “Gold-n-Sno Cake.” So when browsing late 19th century magazines, the phrase “Orange Omelet” leapt out at me. I had to try it. Oranges, sugar, and eggs — sounds lovely. When do we eat?
You can still find sweet orange omelets here and there, but they are decidedly old-fashioned. None of my modern cookbooks contain one, but they are frequently found in classic late 19th/early 20th century cookbooks such as Fannie Farmer’s Boston Cooking-School Cook Book, The Settlement Cook Book, and Mrs. Lincoln’s Boston Cook Book.
The orange omelet, however, goes back a lot further than that — at least to the 1430s, when Johannes Bockenheim, cook to Pope Martin V, published this recipe in his cookbook:
Take eggs and break them, with oranges, as many as you like; squeeze their juice and add to it the eggs with sugar; then take olive oil or fat, and heat it in the pan and add the eggs. This was for ruffians and brazen harlots. (“Et erit pro ruffianis et lecceatrichus.”)
Ruffians and brazen harlots? Well, call me a brazen harlot, then.
Bockenheim’s recipe is not terribly different from those that followed about 100 years ago.
Good Housekeeping, February 1898:
An American Omelet.
Make an omelet of four eggs, the yolks and whites beaten separately, four tablespoonfuls of sugar, a pinch of salt, grated rind of one orange and three tablespoonfuls of orange juice, fry. The instant the omelet is cooked, spread the sliced oranges on it and fold or roll the omelet. Serve very hot.
Parisian Orange Omelet.
Take the whites and the yolks of four eggs beaten separately, very thoroughly. To the yolks add three tablespoonfuls of sugar, not more than a pinch of baking powder, two tablespoonfuls of flour, four of milk, one tablespoonful of orange juice. Pour into a heated saucepan, then the whites, fry rapidly, fold, serve very hot with raspberry jam. A delightful luncheon dish.
Good Housekeeping, March 1898:
Orange Omelet.
Four eggs, five tablespoonfuls of sugar, a little salt, two oranges, two tablespoonfuls of butter. Grate the rind of one orange on one tablespoonful of sugar. Pare and cut the orange in thin slices and sprinkle with two tablespoonfuls of sugar. Beat the whites of the eggs stiff, add the sugar and orange rind, salt, beaten yolks, and two tablespoonfuls of orange juice. Put butter in a hot omelet pan and pour in the mixture. When it begins to thicken well, spread over the sliced oranges (no juice). Fold omelet from the side of the pan over the sliced oranges, turn on a hot dish; put in the oven two minutes, and serve immediately.
Then, about 20 years later in The Way to a Man’s Heart: The Settlement Cook Book (about which I will be posting more soon):
Orange Omelet.
Rind of 1/3 orange,
1 egg,
1 tablespoon orange juice,
2 tablespoons powdered sugar.
Beat the yolk of the egg and add the orange rind and juice. Add the sugar. Fold in the beaten white and turn on heated buttered pan and cook until set. Serve with powdered sugar.
I tried the last recipe yesterday — it’s simple, and serves one, which is nice when I’m experimenting. Watch this space tomorrow for the results.
One more try at the Welsh rabbit. Photo by Wendi.Months ago, one of the first recipes we tried for this blog was Welsh rabbit (or rarebit), an old-fashioned dish I’d always been curious about but never tried. It did not turn out well. But it seemed clear (to me, at least) that it was a comedy of errors on our part (including the death of our oven in mid-cook, and our failure to deal with it correctly) that probably led to the recipe’s failure, and I vowed to try it again. Now I have a working stove and oven, so the time seemed to be right.
In the comments for the last Welsh rabbit post, reader Lynn wrote:
Do try the rarebit again…it is delicious. I serve it over a bowl of nice bread, cut as for fondue, with steamed broccoli and some nice red bell pepper strips. Quick, pretty inexpensive and really good on a winter night.
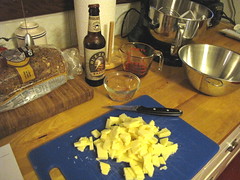
Here are my notes: Use a double boiler and cook out the roux first, beat the egg into the beer and thin the roux with this, then melt in the cheese. Foolproof.
We took her advice, using our recipe but her directions. The ingredients were the same, except that we used Buzzsaw Brown Ale instead of Newcastle. We used a metal bowl as a double boiler, and this time the rabbit sauce was dead easy to make and no trouble whatsoever. Lynn was right!
Although we now have a working oven again, I was taking no chances — I just toasted the bread in the toaster this time, playing it safe.
For a side dish, I served a salad with a sweeter balsamic vinaigrette dressing to balance out the salty savoriness of the Welsh rabbit. It worked perfectly.
Kristen wasn’t here that night, and is skeptical that the Welsh rabbit can be good after all, so I’ll be making this again for her to try. The men in the house loved it, though.
The lighting wasn’t great by this time of night (do all the other food bloggers do their cooking in the daytime or something?), but I did get a picture of the finished product:
Compare this with the picture here, and it’s obvious this was a much more successful experiment. Thanks, Lynn!
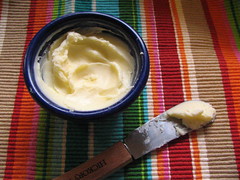
My homemade cultured butter.So, I still can’t cook anything in our kitchen. But there are a few things I can do. One of them is to make a batch of cultured butter. I have a bowl of cream culturing right now.
Butter isn’t exactly one of “the recipes that are no longer in vogue, but were familiar to our grandparents, or even our great-great-grandparents and beyond.” We’ve never really stopped eating butter, though people have cut back over the years for health reasons. Butter itself, though, is still found in every grocery store.
The thing that has been nearly forgotten, though, is how to make it. This was a skill that nearly every housewife once had, and now we let dairies do it for us. It’s more convenient that way, but some would say that we’ve lost quite a bit of flavor that way as well. Some of us had the experience of shaking a jar of heavy cream to make butter in school or at Girl Scouts, and others have accidentally made butter when trying to whip cream, but most Americans today have probably never seen butter made.
The butter we buy in the grocery store is also different from traditional farm butter. It’s “sweet cream” butter, made from fresh, sweet cream. Sounds good, right? Well, it’s pretty good, but it turns out that traditional butter is not made from sweet cream at all. It’s made from sour cream. And it tastes much better and more “buttery” than sweet cream butter.
Notice the terminology Dr. Rahn uses in the image above: “ripening the cream.” To our modern mind, letting cream go sour is a bad thing. But done right, it’s “ripening” the cream, making it “fit for churning,” as an old cookbook I read puts it. Notice also the perspective on sweet cream butter: “the unusual flat taste and its bad keeping qualities.” My, how tastes have changed.
Traditionally, cream for butter was skimmed from the milk, and then kept for a while until it had soured and become fit for churning. Natural bacteria in the cream and the environment would cause the cream to clabber, to become nicely soured. Modern milk is pasteurized and homogenized, so it doesn’t separate into cream and milk, and it doesn’t contain the “good bacteria” needed to clabber. Left alone, it will just sour in a bad way instead.
The separation problem isn’t too bad. We can buy heavy cream in cartons, separately. (Try to find cream that isn’t ultra-pasteurized, and contains only milk and cream in the ingredients list. No carrageenan, etc.) The bacteria problem is also solvable. We need to put the good bacteria back into the cream, and we do this by either buying a commercial starter culture, or just some buttermilk that contains live cultures. The buttermilk is probably at your grocery store.
So here’s what you need:
1 quart of heavy cream (not ultra-pasteurized, no extra ingredients)
My milkman only delivers cream in pints, so I just get two pints at a time.
1/3 cup of buttermilk with live cultures
You can freeze extra buttermilk in ice cube trays so you don’t have to buy a new carton every few weeks just to make a little butter. Three cubes are about 1/3 cup. I haven’t tried the frozen buttermilk trick yet, though — I’m freezing some now for next time.
1 spotlessly clean glass or metal bowl with a cover
And here’s what you do:
Pour the cream and buttermilk together in the bowl and stir gently to mix. Cover the bowl and put in a warm place overnight. (My last batch needed to ripen for 18 hours.) By warm, I mean 70-80F. As the time approaches, it should smell good — not like rotting milk, but like delicious crème fraîche. Which is what you are making at this point. When it’s ready, it will thicken to something like sour cream thickness (of course!). It will smell like heaven and taste just as good. Now bring the cream to a temperature of around 60F.
At this point, you could churn it. But since you probably don’t have a churn, a stand mixer will do. I have a KitchenAid, like the one Kristen posted about recently. (Mine is a green Epicurean model.) I put the cream into the bowl, and stir at medium low speed with the paddle attachment. Do not use high speed, because if you do, when the cream turns to butter, you will have a mess all over your walls. The slow stirring will do the trick. Watch it. If you have 60F cream, and it’s ripened nicely, it may become butter quickly. (5 minutes for my last batch.) But it could take quite a bit longer, too. Watch and you will see it become creamier, creamier, a bit grainy… sploosh! Butter grains floating in buttermilk.
When the grains are about rice-sized, drain the buttermilk (you can cook with it, or use it as starter for another batch), and rinse the butter under cold running water, working the butter by kneading it, squeezing and pressing and folding, and rinsing until the water runs clear. If you don’t do this, your butter will go rancid quickly.
Then keep working the butter to get as much water out of it as you can. This is when you can add salt, which helps it to keep longer.
You should have about a pound of butter after you are done working it. I divide it into fourths and freeze all but one, which is the one we will use right away. I put that one in a cloche de beurre, which is a little crock that keeps the butter cool but spreadable.
The cultured butter will have a stronger butter flavor than you are used to, and you will want to spread it on everything. Be warned.
As it turns out, we are not only without a stove for a while at my house, but we are also out of a kitchen floor. So I will be unable to cook anything for a while, which is annoying.
The Royal Society of Chemistry didn’t publish the recipe they used, but there are gruel recipes here. Truthfully, it sounds a lot like the oatmeal porridge I’ve made for Jason in a slow-cooker. With the right added ingredients it could probably be good. But plain Oliver Twist workhouse-style gruel was probably never all that appetizing, though those in workhouses were hungry enough to eat it anyway.
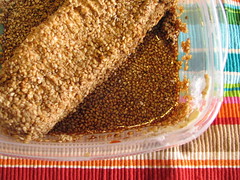
Cream cheese covered with sesame seeds... and soy sauceRecently Elizabeth emailed me a vintage recipe, saying: “Here is one of my mom’s favorite cocktail party recipes from the 1960s. People scoff at it, but when I put it out at a party it gets eaten fast!”
Since we currently don’t have a working kitchen stove, and last night I had to go to an event where bringing food was encouraged, it seemed like a great time to try this one out. Here’s the recipe:
Remove a block of cream cheese from the fridge and let it get a little soft, but not goopy.
Fill a dish with a good sized lip on it with lots of sesame seeds.
Press each side of the cream cheese into the seeds so that they really stick into the cheese.
Set the cream cheese on top of the remaining sesame seeds.
Pour liberal amounts of soy sauce on top of the cheese. you want enough sauce to accumulate in the dish to touch the bottom of the cheese, but not so much that the seeds float off the sides.
Place the dish in the fridge and turn the cheese a couple times.
When ready to serve, transfer to a clean dish and, if necessary,
sprinkle more sesame seeds on top.
Serve with Wheat Thins.
We served it last night and it was entirely consumed. People liked it a lot, though some people were unsure at first what the heck it really was. (And we didn’t know what to call it.) The recipe has a vintage vibe, but it’s pretty darn tasty to the modern palate, as well as being simple and not requiring any actual, you know, cooking. Thanks for the recipe, Elizabeth!
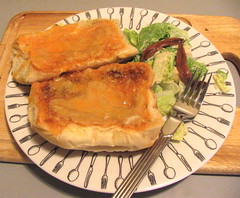
The finished product; not very pretty, but it tasted good -- to some of us(This is part 2 of the Welsh Rabbit story. See Part 1 for the background.)
Kristen and I gathered at the house tonight to make our Welsh Rabbit. Kristen brought Caesar salad to eat along with the “rabbit.” Jason was there to help eat the food.
The recipe we decided to use, as I mentioned earlier, was from the Good Housekeeping Woman’s Home Cook Book, exactly 100 years ago in 1909. They claim that all the recipes in that book are triple-tested, so we are hoping that this well-tested recipe works for us. Here it is:
A Really Digestible Welsh Rarebit
Melt one tablespoon of butter, add one-fourth of a teaspoon of salt and paprika, half a teaspoon of dry mustard and one-third of a cup of ale or beer. Stir constantly, and when hot, put in half a pound of cheese cut into small pieces. As it gradually melts it may thicken, for no cheese is exactly alike in the amount of liquid it requires. If it seems too thick, add more beer. If the rarebit is preferred creamy instead of stringy, add one beaten egg just before serving. The paprika in this recipe makes the cheese mixture perfectly digestible. If the regulation toast is not at hand for serving rarebit, pour it over saltines.–I. G. C.
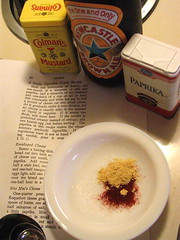
This is not too difficult a group of ingredients to assemble. For the cheese, we picked up some Coastal Rugged Mature English Cheddar Cheese at Costco, and it’s really tasty stuff. Yum. For the ale, we got Newcastle Brown Ale. For the toast, we had some rolls from the local bakery — probably not exactly what was intended, but they were fresh and seemed as if they’d make fine toast. I got all the ingredients together, sliced the rolls and put them on a baking sheet, turned on the oven to toast the rolls, and was ready to start cooking.
Some ingredients waiting to be made into tasty sauce
I melted the butter, and then added the spices and beer. So far, so good. I wanted to get the rolls toasting so they would be perfectly toasted right about the time the sauce was done. But first, I put the cheese in the pan. This was probably a miscalculation. As I stirred the cheese, Kristen opened the oven to put the rolls under the broiler, and… the oven was cold.
Broken, that is. The knob had been turned on correctly, but nothing happened. I continued stirring the cheese, and the sauce looked about perfect… but we had nothing yet to pour it on. Jason came in and twiddled with the oven and got it to come on. Then it turned itself off. Then Jason got it to go back on again. The rolls were finally toasting… and right before our eyes, the cheese sauce started to separate. We cooked it too long, I think.
We added the beaten egg as the recipe optionally calls for, but we still had an ugly-looking stringy mess. Smelled good, though.
Shortly after we poured it on the toasted rolls, sort of. The thickest parts sort of glopped on. Kristen said it was “unappetizing.” We dished up our salads and settled down to eat.
The verdict:
Wendi: Thought it was ugly, and obviously not what it was supposed to look like, but it actually tasted pretty good anyway. Kind of salty, though. Would be willing to try it again.
Kristen: Hated it. Would not try it again. Thought it was too salty.
Jason: Liked it and would definitely eat it again. Enjoyed the leftover brown ale with it, too.
If I try this again, and I probably will, I will probably just toast the bread in a toaster, and heat the sauce under much lower heat, so it would not cook as quickly. Since it was a chafing-dish meal in the first place, I really should have done that all along. (What was I thinking? This was pure cook’s error. I would have gotten away with it if not for those meddling kids if I’d taken the sauce off the burner as soon as it looked right, though.) Also, I would probably not add all the salt in the beginning, and would salt to taste a bit later, which might help with the saltiness Kristen and I noticed. The aged cheddar seemed particularly salty in flavor to start with. This may be something that varies with different cheeses, I think. Other recipes I’ve seen include a little flour; I wonder if that would make the sauce a bit more manageable.
Having anchovies in the Caesar salad with it did not help as far as saltiness is concerned! Something to balance out the salt would be nicer as a side dish. Maybe a sweeter salad dressing?
I think one of the reasons that this dish has fallen by the wayside in recent years is the fussiness of making the cheese sauce. The average American household, sadly, is probably more likely to open a can, or just have a toasted cheese sandwich when it comes down to it.