The “very good cake” experiment: 17th century fruitcake

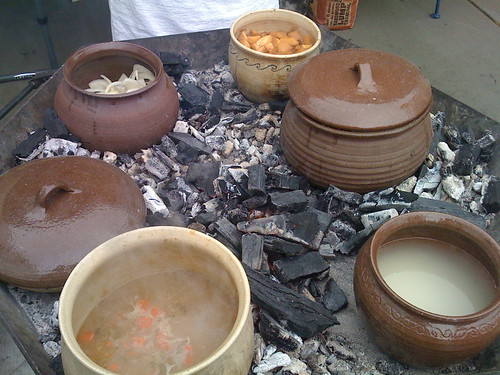
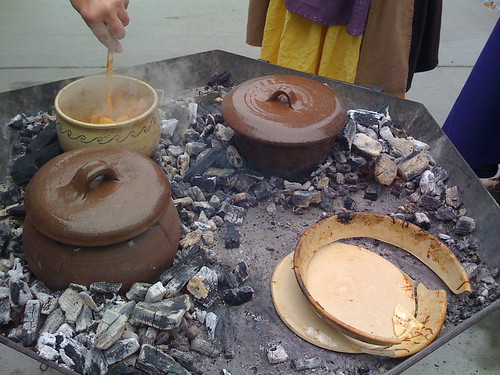
Last weekend, after the “cooking with medieval pottery” class I mentioned earlier, I took another class, this one on historic cooking from primary sources.

In the class, we were divided up into pairs, and each pair was given a recipe in its original language, along with access to the necessary ingredients, and then we had to figure out the recipe, convert the ingredients to modern terms, cook the food, and eat it. We had four hours.

My team’s recipe was easier to understand than many of the others, since it was a 17th century recipe instead of a medieval one, and actually included some measurements. Older recipes tend to say things like “add some [ingredient] until it is enough.” This one had measurements, but some were a bit odd.

This is the recipe we were given:

ANOTHER VERY GOOD CAKE

Take four quarts of fine flower, two pound and half of butter, three quarters of a pound of Sugar, four Nutmegs; a little Mace; a pound of Almonds finely beaten, half a pint of Sack, a pint of good Ale-yest, a pint of boiled Cream, twelve yolks, and four whites of Eggs; four pound of Currants. When you have wrought all these into a very fine past, let it be kept warm before the fire half an hour, before you set it into the oven. If you please, you may put into it, two pound of Raisins of the Sun stoned and quartered. Let your oven be of a temperate heat, and let your Cake stand therein two hours and a half, before you Ice it; and afterwards only to harden the Ice. The Ice for this Cake is made thus: Take the whites of three new laid Eggs, and three quarters of a pound of fine Sugar finely beaten; beat it well together with the whites of the Eggs, and Ice the Cake. If you please you may add a little Musk or Ambergreece.

The Closet of Sir Kenelm Digby Opened, 1669

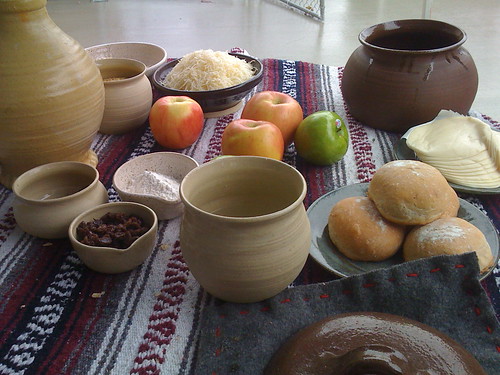
The first thing we noticed is that this is a very large recipe. Converting the ingredients to a list, you have:

  • 4 quarts flour
  • 2 1/2 pounds butter
  • 3/4 pound sugar
  • 4 nutmegs
  • “a little Mace”
  • 1 pound of ground almonds
  • 1/2 pint sack
  • 1 pint ale-yeast
  • 1 pint boiled cream
  • 12 egg yolks
  • 4 egg whites
  • 4 pounds currants
  • 2 pounds raisins

And the icing:

  • 3 egg whites
  • 3/4 pound sugar

This cake was way too big, so even though the measurements were relatively straightforward, we were going to have to convert things to make a smaller cake. We decided to make 1/4 of the recipe, and ended up with something sort of like this:

  • 4 cups flour
  • 2 1/2 sticks of butter
  • a scant 1/3 cup of sugar
  • 1 nutmeg, grated
  • a pinch of mace
  • 3/4 cup ground almonds
  • 1/4 cup Dry Sack
  • 1 envelope yeast
  • 1/2 cup half and half
  • 3 egg yolks
  • 1 egg white
  • 1 pound currants
  • 1/2 pound small raisins

And the icing:

  • 1 egg white
  • 1/4 pound sugar

Unfortunately, I am not the one who wrote down the measurements, and I don’t have the written-down version, so I am not entirely certain this is exactly what we used. Basically, though, the conversions were pretty straightforward, and it probably wasn’t different from what I’ve written here.

To make it, we mixed the butter with the flour until the lumps were gone. Then we added the sugar, nutmeg, mace, and almonds. Then the sack, the egg yolks and white, the currants, and the raisins, and mixed it into a pasty, heavy dough. We warmed the cream a bit and put the yeast into the cream, then waited until it “woke up.” We then added the yeasty cream into the dough and mixed it.

We then put the dough into two small cake pans (one a Bundt pan, and the other a small springform).

We covered the dough with a towel and let it rise for a little more than 1/2 hour. (At first we had it in a place that didn’t seem warm enough, so we moved it to a warmer place and let it rise a bit longer.) It didn’t really seem to rise much, which was a bit nerve-wracking, but we had a deadline, so we went ahead and put it in a 350F oven for about 30 minutes, and when we checked on it after 30 minutes, it was perfectly done. (Which we weren’t expecting. At least, I wasn’t.)

A short while earlier, my teammate looked at the icing instructions to take the egg whites and sugar and “beat it well together with the whites of the Eggs,” and said “it’s a meringue! Beaten egg whites and sugar, put back into the oven to ‘harden the icing’!” So we whipped up a meringue for the top of the cakes.

When we took the cakes out of the oven, they smelled amazing, and looked pretty good too — golden and studded with raisins and currants. With a spatula, I put the meringue on the top and tried to make it look pretty. I probably didn’t do that well at the pretty-making part. I didn’t ice the sides because we didn’t really have that much meringue. Then we put them back in the oven for a bit to brown the meringue.

Here are the cakes when finished:

17th century cakes

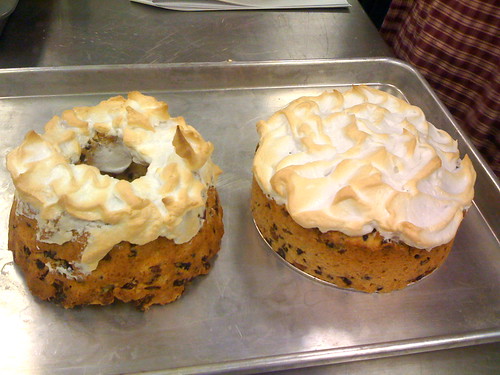
The verdict: Well, I thought they were wonderful. They were a fruitcake of sorts, but not a nasty modern fruitcake. You could taste the sack and the nutmeg, and of course the sweet currants, and while warm, the scent of the cake was incredible.

The meringue was OK, though I’d do something else instead. Just a powdered sugar icing drizzled on it, or something like that. I am not a huge fan of meringue, and I think it would be fine with an alternative icing, or even without one at all. It would also look less goofy, perhaps.

I notice that other folks online who have tried this recipe did not interpret this part of it as a meringue, just as an egg white/sugar glaze. I think this probably makes more sense.

The cake was fairly dense, but not overly so. The yeast did apparently have some effect, even though the cake didn’t rise much. The density felt like the right amount.

I would make this again, and it is definitely a wintertime sort of cake. Too heavy for summer, but perfect for December.

Happy Thanksgiving: My grandma’s pumpkin pie

My grandma's pumpkin pie recipe

This is a recipe card from the 1960s or early 1970s with my grandmother’s pumpkin pie recipe. I make this recipe at least once a year, and it’s always very good. You can see it’s been spilled on a few times! None of that evaporated milk stuff for Grandma — this uses none of it, and just has you scald the milk. And none of those premixed “pumpkin pie spices”! You can mix your own.

Pumpkin Pie
Serves 6
Recipe from the kitchen of Mom

1 recipe pie crust
2 c. pumpkin – add 2 eggs beaten slightly – Add
1/2 c. granulated sugar
1/2 c. brown sugar
1 t. cinnamon
1/4 t. ginger
1/4 t. cloves
1/2 t. salt
Add 1 c. scalded milk. Pour into shell and bake at
450F – 10 min.
350F – 30 min.

For 2 pies use large can pumpkin and double everything else.

I suppose it could be written a little more clearly. I’d probably edit it to read as follows:

Pumpkin Pie
Serves 6
Recipe from the kitchen of Mom
Edited by Wendi

2 c. (one small can) pumpkin
2 eggs, beaten slightly
1/2 c. granulated sugar
1/2 c. brown sugar
1 t. cinnamon
1/4 t. ginger
1/4 t. cloves
1/2 t. salt
1 c. scalded milk
1 recipe pie crust

Preheat oven to 450F.
Stir beaten eggs into pumpkin.
Add dry ingredients (sugar, spices, salt) and mix well.
Stir in scalded milk until mixture is smooth.
Pour into shell and bake at 450F for 10 minutes,
then lower the oven temperature to 350F and continue cooking for 30 more minutes.

Pie is ready to serve when a knife stuck in the middle comes out clean.

For 2 pies, use a large can of pumpkin and double everything else.

Pumpkin pie isn’t really a recipe that needs resurrecting — people eat it every Thanksgiving. It hasn’t lost any popularity. But most recipes you see these days call for evaporated milk, so perhaps this version with plain milk will interest some of you. (I’ve used this recipe with soy milk, incidentally — and it was delicious.)

Cooking in a medieval style

This weekend I took some classes on historic cooking. One involved cooking a 17th century cake recipe from the original source text — that is, not translated into modern English, and not converted into modern measurements. I’ll be posting here about that experience, later.

Medieval pottery and food

The first class, though, was about medieval pottery, and how it would be used to cook. Mistress Gwenllyen the Potter showed us some examples of her pottery (all done based on authentic medieval designs), and then started right in on the cooking.

During the two-hour class, there were as many as 6 pots on the brazier at one time. The brazier had very hot charcoal, which was nice, because it was keeping us warm in the November weather as well as cooking lunch. To heat up a pot more, Mistress Gwen would just rake the coals closer to the pot, and to cool it down, just rake them further away.

Six dishes cooking at once

The dishes you can see in the above picture are, starting at the upper right and going clockwise, stewed apples and spices (so good), chicken cooking on top of orzo pasta in the closed pot, rice (just started), beef stew, makerouns (in the closed pot on the left) and onion soup, just starting.

It worked really well. The pots that needed to come to a boil did so quite quickly. Three times during the workshop, however, we heard a loud cracking noise, indicating that one of the pots had cracked. The most spectacular breakage came when the pie plate cooking our makerouns (medieval macaroni and cheese, and quite tasty) broke into multiple pieces, as you can see in the next picture. We didn’t know it had broken into so many pieces until someone tried to pick it up, and the base (and food) stayed on the brazier while the edge of the pan lifted away. Have no fear, the food was fine. There was no spillage. We just had to scoop it off of the pan-base onto a plate.

Pie pan that died, but not before cooking tasty food

It is pretty obvious why archaeological sites have so many potsherds — it seems very common for cooking pottery to break in use.

Despite the breakage, no serious amount of food was lost (just a little bit of mulled cider, I think), and everyone was warm and well-fed. It was a very fine meal.

Found in the back of a 1930 cookbook

Recipe pinned in the "Silent Hostess" cookbook.

This clipping was pinned in the back of my 1930 Silent Hostess Treasure Book cookbook.

Lemon Pudding

4 eggs
1 1/2 cups of sugar
2 cups of sweet milk
2 tablespoons of flour
2 tablespoons of butter
2 lemons

Mix the four eggs, (except the whites of two which should be reserved for a meringue) with the juice of the two lemons and the grated rind of one of them, the sugar, and the butter, melted. Blend the flour with two tablespoons of the milk and gradually add the rest of the milk to it, stirring as you add. Combine the two mixtures, (egg and milk) and lightly beat them to blend. Pour into a well buttered baking dish and bake half an hour in a moderate oven. Beat the whites of the two eggs stuff, beat in the four tablespoons of sugar, flavor with a little of the grated rind of lemon and heap on the top of the pudding after it has baked a half hour. Put back in the oven, reduce the heat to a very moderate oven and brown the meringue delicately.

Tomorrow: Vegetable Loaf.

The clipping is undated, and there is no indication as to the source, but the references to a “moderate” and “very moderate” oven (and to a “quick oven” in the recipe that follows) mark it as being relatively old. A moderate oven is about 350 degrees F. Very moderate is probably about 325 (most conversion scales don’t list “very moderate”, but the recipe does say to “reduce the heat”). A quick oven is about 375-400 degrees. You can find a conversion chart for these old-fashioned temperatures (and measurements) here.

A baked pudding with meringue isn’t entirely unheard of these days (particularly as a pie filling), but I bet most folks who make pudding at home make it from a box. Which is an entirely different sort of pudding from this one. (And, hopefully, a different sort from the pudding discussed in “Poisoned By a Lemon Pudding: Narrow Escape of a Family of Six at Westwood, O.“, an 1890 article in the Chicago Daily Tribune. Unfortunately, the Trib wants $3.95 for access to the article, so for now, the cause of the family’s lemon pudding poisoning will remain a mystery.)

At the bottom of the clipping is a “Requested Recipes” feature, written in a charmingly-dated style:

Requested Recipes

“BISCUITS”: Milk and water biscuits you say this recipe is to be. But even more important than that would have been the information as to whether they were “raised” or “baking powder” biscuits. We shall chance the latter: 2 cups of flour, 4 teaspoons of baking powder, 1 teaspoon of salt, 2 tablespoons of shortening, and 3/4 cup of milk and water mixed. Sift the flour, baking powder and salt; genetly rub the shortening into these with the tops of the fingers, then stir in the milk. Pat or roll on a lightly floured board. Cut with a round cutter and place on a buttered pan or baking sheet. Prick the top with a fork and bake about fifteen minutes in a quick oven.–(FOR MRS. S.)

The back of the clipping, unfortunately, does not tell us where or when it came from. It is part of an ad for a rayon bedspread, shown on a very old-style bed. My guess is that it is contemporary with the cookbook itself. Rayon was already known and used by 1930.

The Tomato Jelly Salad experiment

This weekend, the time came to make the previously-mentioned Tomato Jelly Salad, a tomato aspic dish that is in the suggested Thanksgiving menu in the Silent Hostess cookbook from 1930.

The tomato aspic experiment: getting started

Here is the recipe, from page 50 of the Silent Hostess Treasure Book. The Tomato Aspic is the basis of the salad, so I’ll list it first:

Tomato Aspic
2 tablespoons gelatin
1/4 cup cold water
1/2 cup boiling water
4 cups tomatoes, fresh or canned
1 tablespoon chopped onion
1/2 teaspoon celery seed
2 or 3 whole cloves
1 teaspoon salt
1 teaspoon sugar
2 teaspoons lemon juice

Soak the gelatin in cold water and dissolve in boiling water. Cook the tomatoes, onions, celery seed, cloves, salt and sugar for fifteen minutes. Strain through fine strainer or cheese-cloth; add lemon juice and dissolved gelatin. This may be molded at once or it may be kept in covered jar in refrigerator Cabinet until needed. To use, take out what is wanted and melt over hot water. Suggestions for several variations follow.

Tomato Jelly Salad
Fill individual molds which have been dipped in cold water with Tomato Aspic. Chill until firm. Unmold on crisp lettuce and serve with mayonnaise dressing.

And on page 57, the dressing:

Mayonnaise dressing
2 egg yolks
1/4 cup vinegar
1/8 teaspoon pepper
1 teaspoon salt
1 pint salad oil

Beat egg yolks and add few drops of vinegar. Drop oil, drop by drop, into egg mixture until one-fourth cup is used. Then gradually increase the amount of oil added, beating constantly. As mixture thickens , add the rest of the vinegar a little at a time, Add salt. Lemon juice may be used in place of vinegar, if preferred.

I got canned tomatoes, as at this time of year, it’s likely that a homemaker in 1930’s Seattle wouldn’t have access to fresh tomatoes. I thought about adding some Tabasco or something else to give it some spice, but decided it was better to follow the recipe as is for testing purposes. After cooking the mixture of tomatoes and spices, I drained the tomato puree, mixed the juice with gelatin, and poured it into some cups to mold.

The tomato aspic experiment: Straining the tomato mixture The tomato aspic experiment: In the molds, ready to go in the fridge

Then the cups went into the refrigerator to chill. A bit later, Kristen and I made the mayonnaise. Living dangerously, we decided to risk an uncooked egg mayo. (The eggs were, at least, organic and well-washed.) Making mayonnaise is slow (dripping the oil in, drop by drop) but the results are pretty good. The recipe above probably includes too much salt, though.

Then, it was time to eat the Tomato Jelly Salad, served on a lettuce leaf with a jaunty cap of mayonnaise. (Unfortunately, we accidentally froze our lettuce, so the lettuce leaf itself was a little bit icky. It worked ok for photos, though.)

The tomato aspic experiment:

Verdict:

I have an odd ambivalence about this. It doesn’t exactly taste bad — it tastes like V-8 or tomato juice, and I like V-8. But for some reason I don’t really want to make this or eat it again. I think it’s got to be a textural thing. V-8 is great, but gelatinous V-8? Well, I’ve never developed a taste for it. It feels odd to me. I don’t hate this, or even exactly dislike it, and the flavor is OK, as I said. It’s just not really likable.

Kristen tasted it, and did not like it. Jason suggested that it might be better sliced on crackers. Perhaps. The next morning, he ate it in cubes mixed with fried egg, and said “ehhh, I probably won’t eat any more.” Jesse tried it, and his response was about the same as mine.

So, the mystery remains: why did gelatin salads take US culinary habits by storm in the early 20th Century? Based on the evidence of the Tomato Jelly Salad, we can’t yet imagine why. But we will experiment further.
Read More

Ready to go

Ingredients for tomato aspic

The supplies are here. The lettuce is in the fridge, and I didn’t bother photographing the salt and sugar, etc., but the items pictured here are the rest of those needed to cook the 1930 Tomato Jelly Salad recipe. Stay tuned to see how it goes.

In the meantime, here’s an old recipe for Tomato Jelly — not the same one I’m going to use, but sort of similar. I kind of like that this one has Tabasco in it. Makes it a little more like spicy V-8.

And a bonus illustration of another aspic recipe that I believe I will avoid:

Both of these are from Practical Cooking and Serving: a Complete Manual of How to Select, Prepare, and Serve Food by Janet McKenzie Hill, 1902. (These are Google Books clips, so you may not be able to see them if you’re outside the US. I apologize.)

Time for a big aspic challenge

Aspic. When was the last time you ate it? Have you ever? Maybe not. It’s not really popular these days.

How about gelatin in general? When was the last time you had gelatin (as a major part of a meal, not just a minor ingredient) that wasn’t some brightly-colored fruity-sweet hue? (Heck, I can’t even remember the last time I ate Jell-O.)

As a child, I had Jell-O a lot. (And I use the brand-name here because brand-name Jell-O was what we ate. Orange. Cherry. Lime. Whatever.) It was always dessert of some sort. Plain, much of the time, or other times with whipped cream on top or as part of some fruit salad mixture at a family or church get-together. (Few things said “1970s church picnic” like a Jell-O fruit salad.)

What I didn’t know at the time was that these gelatin salads were sort of a last vestige of a gelatin salad craze from a few decades earlier.

The 1920s, if the cookbooks can be believed, were gelatin-crazed. Salads, particularly, were not complete without the clear, jiggly stuff. The Silent Hostess Treasure Book from 1930 says, “With a supply of salad greens, a jar of dressing, and some tomato or lemon aspic in your refrigerator you will be able to prepare a great variety of delicious salads on short notice.” To the 21st century cook, only the greens and dressing would be necessary. But the 1920s homemaker would need aspic to be acceptably chic.
Read More

Another site resurrecting recipes: RecipeCurio.com

While I was searching for versions of the Tomato Jelly Salad recipe as mentioned in the “Silent Hostess” cookbook, I stumbled across the very cool RecipeCurio.com. Like us, the RecipeCurio blogger resurrects old recipes, by posting recipes from vintage cookbooks, newspaper clippings, and handwritten recipe cards. It is wonderful to see bloggers posting these old recipes that might otherwise have been forgotten.

I think I may have to try the Peach & Sour Cream Pie.

Buy an Electric Refrigerator


(From 1926, it says, but it shows an early Monitor Top fridge interior, so perhaps it’s a year or so later.)

Once you’ve bought your electric fridge, you’ll be able to make recipes like this one, from the 1930 GE cookbook The “Silent Hostess” Treasure Book:

Chocolate Ice Cream

  • 1 1/2 oz. unsweetened chocolate (1 1/2 squares)
  • 2 cups rich milk*
  • 1 tablespoon cornstarch
  • 2/3 cup sugar
  • 1 1/2 teaspoons vanilla
  • 1 cup cream
  • Few grains salt

Melt chocolate and add scalded milk very slowly. Mix cornstarch with sugar and add to chocolate mixture. Cook ten minutes, stirring until thickened. Cool, add vanilla, turn into tray of Super-freezer, and freeze to mush. Fold in whipped cream and return to Super-freezer until proper consistency to serve.

(*”Rich milk” is essentially what we now call “half and half”.)

A “model kitchen”: Images of early 20th Century kitchens and kitchen goods

I have another web project I should probably mention, since it is somewhat related to the subject of this blog: A “model kitchen”: Images of early 20th Century kitchens and kitchen goods from Google Books (and elsewhere) Some of you may have already seen it when I posted it as a link on Metafilter Projects a couple of months ago, but I never mentioned it here or on Slumberland, I think.

When we started to redo the kitchen, which was built in 1911, I had to (because I’m just that kind of a geek) try to find tons of images of kitchens from that era to try to understand what the kitchen once looked like and how it was used when the house was new. Google Books, as it turns out, has bunches of old magazines and books that have the sort of images I was looking for. Many of them are in old ads. I also have found images in other sources such as the Library of Congress and the Seattle Municipal Archives.

I’ve collected a lot of these images and divided them into the categories of General kitchen views, plans, and cabinets; Refrigerators (ice boxes); Stoves; Furniture; Sinks; Accessories; and Miscellaneous. There are some amazing images, including the 1906 dishwasher and the rotating “U-Turn-It” apartment fixture. Here are a couple of examples from the “General kitchen views” category:

From an Armstrong Linoleum catalog, 1918.

A model electric kitchen, 1924.

Unfortunately, if you are not in the US, most of the images won’t work for you. This is because I used Google Books’ “clip” function to make and host most of the images, and Google won’t show you the images if you’re not in the US. Sometimes changing the “.com” in the Google Books URL to your country’s usual domain (such as .co.uk, or .ca) will make it work for you, but if not, you may not be able to see the images. I apologize. Someday I will try to host all the images myself, and get rid of the Google clips.